Step 10 of 40: Naming Cells
This step illustrates how to assign names to worksheet cells.
Visual Reference
Step-by-Step Instructions
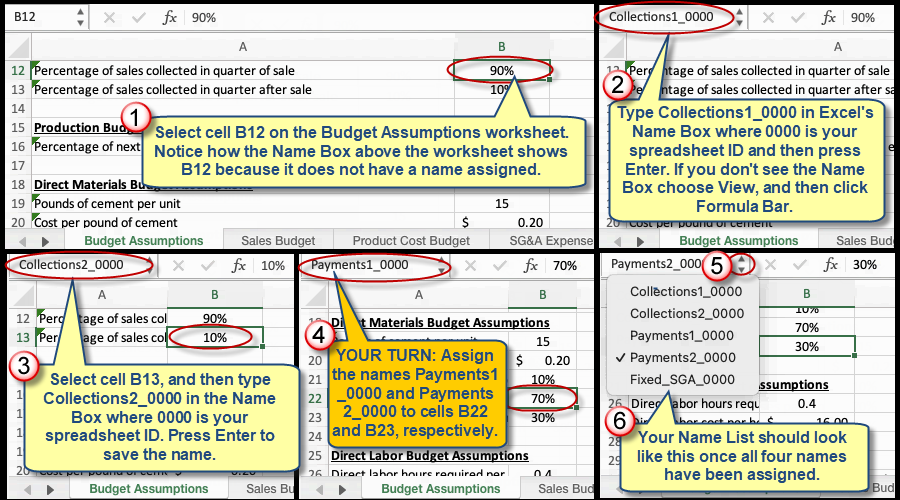
- Select cell B12 on the Budget Assumptions worksheet.
Notice that the Name Box above the worksheet shows B12 because this cell doesn’t have a name assigned.
- Type
Collections1_0000in the Name Box, where "0000" is your spreadsheet ID, and press Enter to assign the name.
If the Name Box isn’t visible, go to the View tab and click Formula Bar to make it appear.
- Assign
Collections2_0000to cell B13.
Remember, after typing the name, press Enter to save it.
- Assign the names
Payments1_0000to cell B22 andPayments2_0000to cell B23.
Use the same process: select the cell, type the name in the Name Box, and press Enter.
- Click the Name Box drop-down.
- Review the Name List.
Once you’ve assigned the names, click on the Name Box and you’ll see a drop-down list that includes all the names you’ve created, like
Collections1_0000,Collections2_0000,Payments1_0000, andPayments2_0000, as well as theFixed_SGA_0000table, where 0000 is your spreadsheet ID.
Video Demonstration
Video Transcript
0:01 So we assigned a name to our table so we can refer to it in our formulas later. We're also going to assign names to worksheet cells.
0:11 This is going to enable us to make some of our formulas easier, but I will also show you that names you assigned to cells become bookmarks, which can make it easy to navigate to various places in our workbook.
0:26 So to begin, we're going to select cell B12 on the Budget Assumptions worksheet. Right above the worksheet frame is the space called the name box.
0:35 Presently we see that B12 resides in the name box. That's because we have not named this particular cell yet. We're about to.
0:43 One of the ways that we can assign a name is to click inside the Name Box as we see in step 2.
0:48 And we're going to type collections one and then put your spreadsheet ID. Once you've typed that, you'll then press Enter.
0:56 Now, if for some reason you don't see the Name Box, then on the Formulas tab or on the View tab of the ribbon, you'll see that a checkbox, you can click Formula Bar, and you should see the Formula Bar on your screen there.
1:09 Step 3, down at the bottom left, we'll see thatwe're going to click on cell B13, type in Collections 2, and then yourspreadsheet ID, and the press Enter.
1:19 then step 4on your own you'll assign the names payments one and payments two to cells B22 and B23.
1:27 Now the reason for the underscores we cannot havespaces and range names and another rule is that cell names have to begin with aletter.
1:38 So we could not assign a name that has your spreadsheetID first. We have to put at least a single letter first and then we can have letters, numbers, and then no punctuation, but we can use underscores.
1:50 So if you wanna check your work when you're done, step 5, your Name Box list should look like what we see for step 5, wherethere are four names, and then the table name.
1:59 You could click on any name on that list, and then Excel would take you to that worksheet cell. And it wouldn't matter where you were in the workbook.
2:06 You could be on any tab, choose a name, and then jump immediately to that cell or that table. To do this in Excel I'm going to first go up to the Name Box.
2:16 I want to show you how the name box typically looks. Now for this workbook there is a name on the list because we named our table or we created a table.
2:25 So if we had not named the table then it would say Table1 there but we did give it a name and so our table name shows up there.
2:32 Typically this list is blank because most users are not using names in their workbooks. But we're going use names we're going to click on cell B12 and we're going to assign the name Collections1 and thenput I'm putting four zeros in place of a spreadsheet ID.
2:51 So you'll put your spreadsheet ID there. Go to cell B13, Collections2 and then your spreadsheet ID. So on your own then you'll assign names to these two cells here.
3:07 That'll be Payments1 and then Payments2. So I can then show you the final step where if you pull down name box list, you should have five names on the list there.
3:19 Table names fall below the cell names or range names. And so the first four names name cells, the last name names a table.
3:29 If I pick the table name, notice I navigate straight to that cell. If I were on, let's say the last worksheet, I could click again from anywhere in the workbook, choose Collections1, navigate directly to the budget assumptions tab and land on the Collections1 cell.
3:48 So that's one of many benefits that naming cells brings to the table and Excel.
We're here to help
If you're stuck or confused, send a copy of your workbook by way of one of these methods:
• Share: Click the Share command in the upper-right hand corner of the Excel screen, choose Share again, and then share the workbook with support@studentsexcel.com.
• Upload: You can upload a copy of your workbook at www.studentsexcel.com/student-upload.
• Email: You can email your workbook as an attachment to support@studentsexcel.com.